Log4j will be
usually configured using a properties file or xml file externally. So once the
log statements are in place you can easily control them using the external
configuration file without modifying the source code. Now let's see how you can
obtain the same log output as the previous example using the properties file
configuration.
Three main
components you need to configure to obtain the same result are the logger,
appender and layout. The logger object is the one that is used to log messages,
appender is the one that specifies the output destination like console or a
file and layout is the one that specify the format in which the log messages
should be logged.
When you configure using the BasicConfigurator.configure() method by default it uses theConsoleAppender and PatternLayout for all the loggers.
The following configuration creates
the same result as the BasicConfigurator.configure() method.
log4j.rootLogger=DEBUG, CA
log4j.appender.CA=org.apache.log4j.ConsoleAppender
log4j.appender.CA.layout=org.apache.log4j.PatternLayout
log4j.appender.CA.layout.ConversionPattern=%-4r [%t] %-5p %c %x - %m%n
The rootLogger is the one that resides on the top of the logger hierarchy. Here we set
its level toDEBUG and added the console appender (CA) to it. The console appender can have arbitrary name, here its name is CA.
You need to create an appender as
shown and set its layout to PatternLayout. The PatternLayout uses the ConversionPattern to format the message. To know more about the various formating options
you can refer the documentation. ( PatternLayout )
Once the appender is created and its
layout is set you need to specify which loggers can use this appender. If you
set this appender to the rootLogger then all the loggers will log messge to this appender. Since the rootLogger is on top of the hierarchy all the loggers will inherit its logger level
and its appenders. You will see this in more detail in the comming examples.
Here is our example
code.
package com.vaannila.helloworld;
import org.apache.log4j.Logger;
import org.apache.log4j.PropertyConfigurator;
public class HelloWorld {
static final Logger logger = Logger.getLogger(HelloWorld.class);
public static void main(String[]
args) {
PropertyConfigurator.configure("log4j.properties");
logger.debug("Sample
debug message");
logger.info("Sample
info message");
logger.warn("Sample
warn message");
logger.error("Sample
error message");
logger.fatal("Sample
fatal message");
}
}
You need to use the PropertyConfigurator.configure() method to configure log4j using a properties file. Log4j should be
configured only once for the entire application.
When you execute
the example the following output will be displayed on the console.
0 [main] DEBUG
com.vaannila.helloworld.HelloWorld - Sample debug message
0 [main]
INFO com.vaannila.helloworld.HelloWorld - Sample info message
0 [main]
WARN com.vaannila.helloworld.HelloWorld - Sample warn message
0 [main] ERROR
com.vaannila.helloworld.HelloWorld - Sample error message
0 [main] FATAL
com.vaannila.helloworld.HelloWorld - Sample fatal message
Since the rootLogger level is set to DEBUG all the messages are displayed.
The log4j levels
follow the following order.
·
DEBUG
·
INFO
·
WARN
·
ERROR
·
FATAL
If you set the rootLogger level to WARN then only the WARN, ERROR and FATAL level log messages will be displayed and the rest will be dropped.
log4j.rootLogger=WARN, CA
0 [main]
WARN com.vaannila.helloworld.HelloWorld - Sample warn message
15 [main] ERROR
com.vaannila.helloworld.HelloWorld - Sample error message
15 [main] FATAL
com.vaannila.helloworld.HelloWorld - Sample fatal message
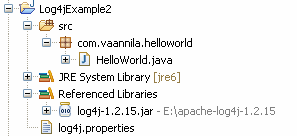
The directory
structure of the project is shown below.
 Download Log4j examples source code
No comments:
Post a Comment